Un stivuitor electric așteaptă lângă punctul de încărcare la începutul unui schimb. Ecranul pornește, iar utilajul a funcționat normal ieri. Poate operatorul să înceapă mutarea paleților?Încă nu. O scurtă inspecție poate dezvălui o roată deteriorată, o scurgere hidraulică sau un sistem de control al siguranței defect înainte ca stivuitorul să intre pe un culoar aglomerat din depozit. Această listă de verificare pentru inspecția stivuitorului electric folosește modelele QSLIFT QES10E și QES15E ca exemple practice. Respectați întotdeauna manualul de utilizare pentru modelul specific, deoarece componentele și procedurile de inspecție pot diferi.
De ce trebuie inspectat un stivuitor electric înainte de fiecare schimb?
Stivuitoarele electrice combină deplasarea asistată electric, ridicarea sarcinilor, frânarea, sistemele de baterii și controalele de siguranță ale operatorului. Un defect în oricare dintre aceste zone poate afecta operatorul, pietonii din apropiere, mărfurile, rafturile și utilajul în sine. O inspecție constantă înainte de fiecare schimb ajută echipa din depozit să:
- – Detectarea timpurie a daunelor vizibile
- – Prevenirea transformării defecțiunilor minore în reparații majore
- – Reducerea timpilor de nefuncționare evitabili
- – Retragerea din serviciu a echipamentelor nesigure
- – Îmbunătățirea comunicării dintre operatori și tehnicieni
- – Menținerea unei evidențe clare a inspecțiilor. Efectuați inspecția înainte ca utilajul să fie utilizat pentru prima dată în schimb.
Verificați-l din nou după o coliziune, după ce un alt operator raportează o problemă sau ori de câte ori comportamentul utilajului se schimbă.
Începeți cu podeaua și zona înconjurătoare
Faceți o ocolire în jurul stivuitorului înainte de a atinge comenzile. Verificați podeaua de sub unitatea de acționare și catarg pentru urme de ulei, apă sau alt lichid inexplicabil. Nu căutați o scurgere hidraulică cu mâna. Lichidul sub presiune poate pătrunde în piele.c
Căutați, de asemenea:
- Folie stretch, benzi de ambalare sau sârmă în apropierea roților
- Obiecte lăsate libere în zona de încărcare
- Deteriorarea încărcătorului, a cablului sau a fișei
- Urme care sugerează contactul cu rafturile sau pereții
- Obiecte care blochează traseul stivuitorului
Dacă nu puteți identifica sursa unei scurgeri, izolați utilajul și solicitați unui tehnician calificat să o inspecteze.
Șase zone de verificat la un stivuitor electric cu pietoni (însoțitor)
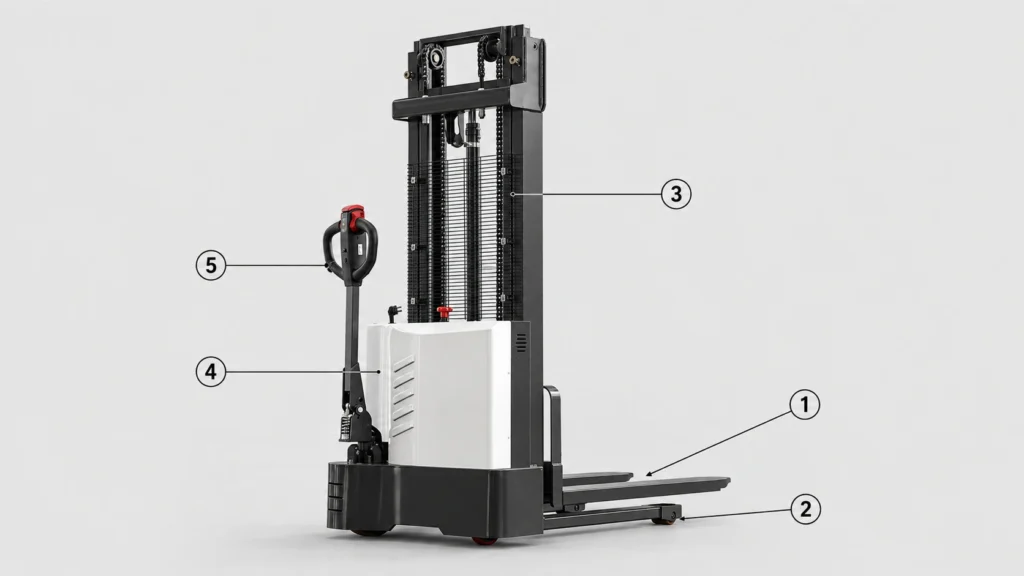
Ilustrația următoare prezintă principalele zone exterioare ale unui stivuitor din seria QES.
Zone de inspecție: 1 furci; 2 roți de sarcină; 3 catarg, lanțuri și zona de ridicare hidraulică; 4 șasiu și capace; 5 comenzi pe timonă; 6 baterie și zona de oprire de urgență.
1. Furci
Priviți de-a lungul ambelor furci, de la călcâi până la vârf.
Verificați pentru:
- Fisuri
- Îndoiere sau răsucire
- Înălțime egală a furcilor / Înălțime neuniformă a furcilor
- Damaged fork tips
- Severe wear
- Semne ale unui impact Furcile trebuie să par drepte, paralele și poziționate uniform. Opriți utilizarea stivuitorului dacă o furcă pare mai joasă, mai uzată sau aliniat diferit față de cealaltă.Nu încercați niciodată să îndreptați sau să sudați o furcă deteriorată fără o evaluare tehnică autorizată.
2. Load wheels
Load wheels work close to the floor and can collect packaging material.
Inspect the visible wheels for:
- Cuts, cracks or missing material
- Flat areas
- Uneven wear
- Plastic film, string or wire
- Damage around the wheel mounting
- Restricted movement
A damaged or obstructed wheel can cause vibration, poor tracking and difficulty crossing floor joints.
Remove only loose debris that you can reach safely. Ask a technician to remove material trapped inside the wheel assembly.
3.Mast, chains and hydraulic system
Inspect the mast from outside the guarded area. Keep your hands, head and tools away from the lifting mechanism.
Look for:
Visible mast distortion
Damaged or heavily corroded chain sections
Chains that appear unusually loose or uneven
Oil around cylinders, hoses or connections
Foreign material inside the mast channels
Damaged guards
Loose or missing visible fasteners
The operator should identify obvious abnormalities, not adjust the chains or dismantle the mast. Qualified technicians must perform chain measurement, adjustment and hydraulic repairs.
4.Chassis and protective covers
Walk around the driving unit and inspect its external condition.
Confirm that:
Covers and panels remain secure
No sharp or broken edges are present
The chassis has no obvious impact damage
Ventilation openings remain clear
Protective guards are correctly fitted
Safety labels remain readable
The capacity plate is present
A cracked cover does not always make a stacker unsafe. However, it may show that the truck suffered an impact. Report the damage so the service team can decide whether to inspect the components underneath.
5.Tiller and operating controls
The tiller is the operator’s main connection with a pedestrian stacker.
Before switching on the machine, look for:
A cracked or damaged handle
Loose switches or buttons
Damaged control housings
Exposed wiring
Missing control symbols
A tiller arm that does not move normally
After the visual inspection, test the controls in a clear area. Travel, steering, lifting and lowering should respond smoothly and predictably.
Also test the horn, braking and the tiller-head reversing safety function where fitted. Stop if a control sticks, reacts slowly or causes unexpected movement.
6.Battery, charging connection and emergency stop
First, confirm that the charger is disconnected. Then inspect the visible battery and charging components.
Check that:
The battery has sufficient charge for the planned work
The plug and cables show no visible damage
No conductors are exposed
Connectors sit in their correct positions
There are no signs of burning or overheating
The battery remains correctly retained
The display shows no unresolved battery fault
The red emergency-stop button must remain accessible and undamaged. Test it according to the machine instructions and confirm that it resets correctly.
Do not use a damaged charging plug or cable. Never modify a connector or bypass a battery-protection system.
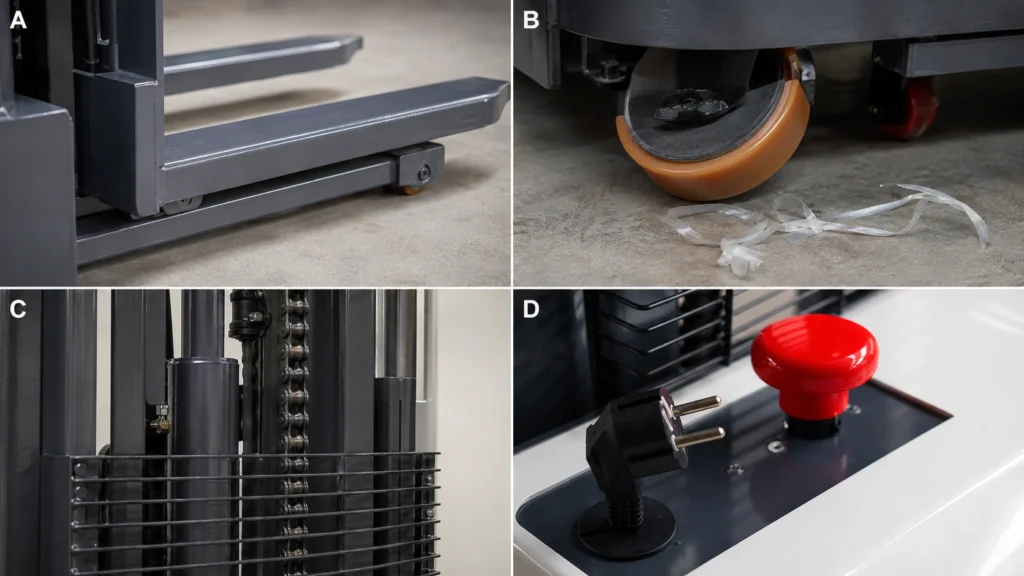
Close-up inspection points
Close-up examples: A, forks and fork heels; B, load wheel and nearby packaging debris; C, externally visible mast chain and hydraulic area; D, emergency-stop button and charging plug.These images show the boundary between an operator inspection and technical maintenance. The operator can look for visible defects and test normal functions. However, the operator should not remove covers, adjust chains, open electrical systems or attempt unauthorised repairs.

 Română